Every RoboRuckus game needs a game master to set up and run the game. That doesn’t mean the game master can’t also play, since their duties are mostly confined to starting the game and managing things between rounds. This guide assumes you’re using the Raspberry Pi server described in Setting Up the Game. The game supports mobile devices, but for clarity only clicks will be referred to, although taps can be substituted for clicks.
Starting the Game
To begin, connect to your Raspberry Pi via its RoboRuckus Wi-Fi network and start the Kestrel server via SSH (terminal). Turn on all the robots you’ll be using in the game, their LED displays should show the letter “A” when they have successfully connected to the server.
If you’ve installed nginx and dnsmasq, open the set up page in a web browser by going to https://roboruckus.com/Setup, otherwise go to http://192.168.3.1:8082/Setup.
At the setup page, select the number of players and choose a game board to play. The number of players is the maximum number allowed in the game, contingent upon enough robots being available. Optionally, drag between one and four flags onto the board; if no flags are used, a “deathmatch” robot game will be started. You should use vinyl decals, stickers, tape, or something like that to indicate on the physical game board where the flags are. Once you’ve finished setting everything up, click the “Setup” button to start the game; you will automatically be taken to the monitor page. The game will not be started yet. When all the players are ready, click the “Start Game” button to deal the first hand of cards and start the game.


Tuning the Robots
Tuning the robots should be done regularly to ensure the robot movement is as reliable as possible. If a robot has its own movement calibration option, you may only need to do this once to initially calibrate the robot, then rely on its built in movement calibration. Each robot design has its own set of tuning parameters to modify, so you should refer to a robot’s specific documentation to learn what those parameters do, and if the robot has its own calibration mode.
To enter tuning mode, navigate to the game setup screen as described above. Make sure all the robots you want to tune are turned on and connected to the game server. Once at the setup screen, select the button that says “Tune Robots”. From there you can select the robot you’d like to tune. Any robots being tuned should be placed on the game board in a square as if ready to play.


Tuning mode has a number of parameters which often fit broadly into two categories: speed and navigation. A robot’s speed should be tuned first followed by the navigation.
The “Speed Test’ button will have the robot attempt to drive straight forward a distance of three board squares, then backward a distance of three board squares. You should fine-tune the robot’s movement parameters until it can reliably complete this movement.
The “Navigation Test” button will have the robot complete a test pattern. It will drive forward two squares, backward one, turn 90-degrees left, turn 90-degress right, then turn 180-degress. You should fine-tune any robot parameters related to navigation until the robot can reliably complete this movement pattern.
When the “Finish” button is selected all the tuning parameters will be saved to the robot. You can abort a robot tune and revert to the previous settings by turning the robot off and back on again at any time before you’ve hit “Finish” button. You will also need to navigate manually back to the initial setup screen and start the process over.
The Game Monitor
The monitor page displays the current game state, which is useful both for the game master and observers. At the top it shows the maximum number of players allowed in the game, and below that is the game board map marked with all the flags and current positions and orientations of all the robots in the game. The game board map is useful if a robot accidentally wanders off course on the real game board, you can see where it should be and pick it up and place it on the correct space.

Next to the board (or below, depending on the screen size) is a list of the current players in the game and their statuses: The player number, their current damage, their current number of flags touched, and their lives remaining. Next to (or below) that is an indicator showing the current player move or board element being executed.
At the bottom of the page are three buttons. First, if the “Timer Enabled/Disabled” toggle is enabled, the thirty-second player timer, for the last player picking their program, will be used; this will only work if there is more than one player in the game and can be toggled anytime as long as two ore more players are programming their robots. Clicking “Restart Game” will restart the current game, with the current players sent back to the Player Setup page. Clicking “Reset Program” will return the game to the initial state, kicking the current players out and allowing the game master to set up the game from scratch with new (or the same) players.
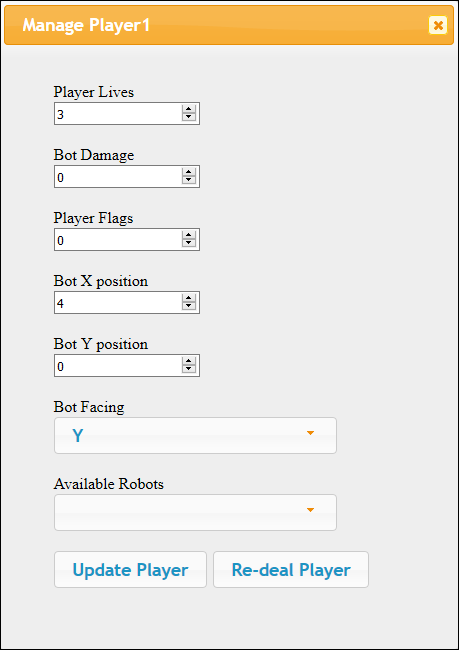
Clicking on any player number (the yellow squares) will pop-up a window that will allow you modify that player. You can change their robot’s location, damage, number of flags touched, lives, deal them a new hand of cards, or even switch them to a different robot altogether. This feature is still in testing, and there is no input validation (you could move the bots to a location off the board, for instance), and if you increase a bot’s damage to the the point where additional cards would be locked, the game server will crash. You can only modify a player in-between rounds, not during.
Re-entering Robots
When a robot, or robots, are destroyed in the game the monitor page will show them in the Player Moves section after the end of the round. Below each robot is the zero-ordered [x, y] coordinate of the last checkpoint (wrench or flag) the robot touched, or the starting coordinate of the robot. The round will be paused and no new cards will be dealt until all the bots are re-entered.
The checkpoint is a suggestion that you, as the game master, can choose to ignore as you drag-and-drop the dead robots back onto the board. After dropping a robot onto the board, clicking it will rotate its orientation.
When a robot is destroyed during a round, it should immediately be picked up and removed from the physical board until it’s re-entered at the end of the round, and then placed on the appropriate space.


Once you’ve re-entered all the robots and set their orientations according to the RoboRally rules, click “Re-enter Bots” to submit the new bot positions and start the next round. After a robot is killed three times the player is out of the game, and they won’t be available for re-entry.
URL Organization
If you or a player gets lost or hits the back button in the browser and can’t find the correct interface page, don’t worry, you can manually get to any page if you know the player number. Use the following guide to direct the players to the appropriate pages when needed, substituting <#> for the player’s number (1, 2, 3, etc…). Here, https://roboruckus.com refers to the game server’s address, not this website.
- https://roboruckus.com/Setup/ – The setup page for the game master, redirects to the monitor address if the game is already set up.
- https://roboruckus.com/Setup/Monitor – The monitor page shows the current status of all the players and robots in the game, also allows the game master to re-enter destroyed robots into the game.
- https://roboruckus.com/Setup/Tuning – The robot tuning page which allows the robots’ movement to be adjusted.
- https://roboruckus.com/Setup/boardMaker – The board maker page which allows for the creation of new game boards.
- https://roboruckus.com/Player/playerSetup/<#> – The player set up page, which allows a player to pick a robot and enter the game.
- https://roboruckus.com/Player/Index/<#> – The main player interface page, where a player can enter their programs to control their robot.
Visiting these pages out of order, like going to a player’s interface page before that player is set up, is potentially unsafe and could cause the server to lock-up, so be careful when manually visiting specific pages.